All posts by twocarolines

Two Caroline's - sisters with the same name and passion for baked sweets! These days Caroline v2.0 is running the blog and selling bakes on the West Tenth app. Bake or buy our recipes for yourself!

Pink Raspberry Birthday Cake

image
Pink Raspberry Birthday Cake by twocarolines

My second born just turned 3 years old and her only request was a pink cake.  I quite enjoy cake, but typically “pink” cakes are something I wouldn’t bother eating.  Usually they are flavorless and uninspired next to their chocolate, carrot, or spiced contemporaries.  I made two goals 1.) to create a pink cake I would actually want to eat, and 2.) to make it not only pink but beautifully gradient in 3 tiers all different shades of pink.  I totally achieved my first goal! But as you can see, I failed on my second goal 😦   I poured my first layer too heavy and opted for a two-tone second layer instead of having them all be different sizes.  Next time I will weigh out my layers to make sure I get 3, but I’m posting this cake anyway because I’m so pleased with how it tastes, it’s the first time I’ve ever been tempted by a pink cake!  The frosting is a mix of a cream cheese and buttercream that is not too crazy sweet, but just perfectly accents the raspberry flavor in the other layers.  I seriously love it – and so did my birthday girl, not that 3 year olds are the most viable critics, but watching her eat this cake with joyous wild abandon was the highlight of my year….so far.  Also, I used cake mix as my base because it makes life easier and unlike cookie or brownie boxes a cake box can be manipulated into something truly delicious.

I will give you instructions for a two tone gradient layer cake, as shown (minus my “medium” pink that was poured into my light pink layer) but feel free to make this into a 3 tone as I originally intended, all you will need to do is use a food scale and dirty some extra bowls as you mix the dark and light layer into a separate bowl creating a medium layer and make sure they are all about the same volume.

Cake Ingredients: 

1 box Pillsbury golden butter cake mix (The brands are not important, but these were the ones I used)

1 box Duncan Hines classic white cake mix

2 cups raspberries yielding 1 cup raspberry juice (you can use frozen, I used some frozen, some fresh, either can give you pretty pink flavorful juice)

2/3 cups butter melted

3 eggs

3 egg whites (reserve yolks for your next cream pie!)

1/4 cup buttermilk

3/4 cup water

red or pink food coloring

Frosting Ingredients: 

3/4 cup butter at room temperature of just softened

6 ounces cream cheese at room temperature

1/4 + 3 tablespoons milk

8 cups powdered sugar (more if needed for proper thickness)

1 teaspoon vanilla

pinch of salt

Make the dark layer:

  1. Preheat oven to 350.  Grease and line with parchment two 9 inch cake pans (I used 9 inch this time, but you can use smaller if you’re doing 3 tiers).
  2. If your raspberries are frozen, defrost them in the microwave or on the stove.  Mash up raspberries and strain them through a fine sieve reserving all the juice you can.  Discard the smashed up leftovers.
  3. Mix 1/4 cup buttermilk, 3/4 cup raspberry juice, 1/3 cup melted butter and 3 eggs until well combined then add golden butter cake mix scraping down the bowl.
  4. Add drops of food coloring just a few at a time until you reach the color of pink you want for the first layer.
  5. If making two layers pour into prepared pan, but not too full, only about 3/4 of the way full, use the rest for some extra side cupcakes.  If making 3 layers set aside until your light layer is finished.

Make the light layer:

  1. Mix remaining 1/4 cup raspberry juice and 3/4 cup water with 3 egg whites and 1/3 cup butter (you can also use 1/4 cup oil, but butter tastes better).
  2. Add your classic white cake mix scraping down the sides and mix well.
  3. Add food coloring just a little bit a time until you get desired color.  I put 1/8 teaspoon of coconut extract in this layer, I loved it, but you can easily omit that and still have a great tasting cake.
  4. If making two layers pour into prepared pan being careful you don’t fill your pan too much or it will spill over.  Only about 3/4 the way and use extra for cupcakes on the side.
  5. If making a 3 tier cake, take out your food scale and start mixing your light and dark in a separate bowl until you have one dark, one medium and one light, all about the same volume.

Bake your cakes together if you can get them all on the same rack and if not be sure you rotate them regularly.  Mine took about 29-31 minutes, but I used a large cake pan quite full.  Check at 25 minutes and bake until they are nicely risen and a toothpick in the center comes out clean.  Let cool 5 minutes in the pan then turn out onto cooling racks to cool completely before frosting.

IMG_0528

Make the Frosting:

  1. Mix your butter and cream cheese until nicely incorporated.  Add milk,  and start to add powdered sugar scraping down bowl at regular intervals.
  2. Add pinch of salt and vanilla.  If your frosting is too runny add more powdered sugar, if it’s too dry, add more milk.  I think it’s easier to work with if you can refrigerate it for 10 minutes or so before frosting your cake.
  3. Add a few drops of food coloring until you get desired color of pink.

Put your bottom layer on a plate or cake stand and plop a good 1/4 or so of your frosting on top spreading a nice thick layer on top of your bottom layer.  Put your second layer on that and use the rest of your frosting by putting all of it on top of your cake and pressing it out and around the sides with a frosting spatula or a knife being sure to never touch the cake, only the frosting, so you don’t pull up crumbs.  Decorate as you please (not my strongpoint).

Oatmeal Chocolate Chip Cookies

IMG_0234
Oatmeal Chocolate Chip Cookies

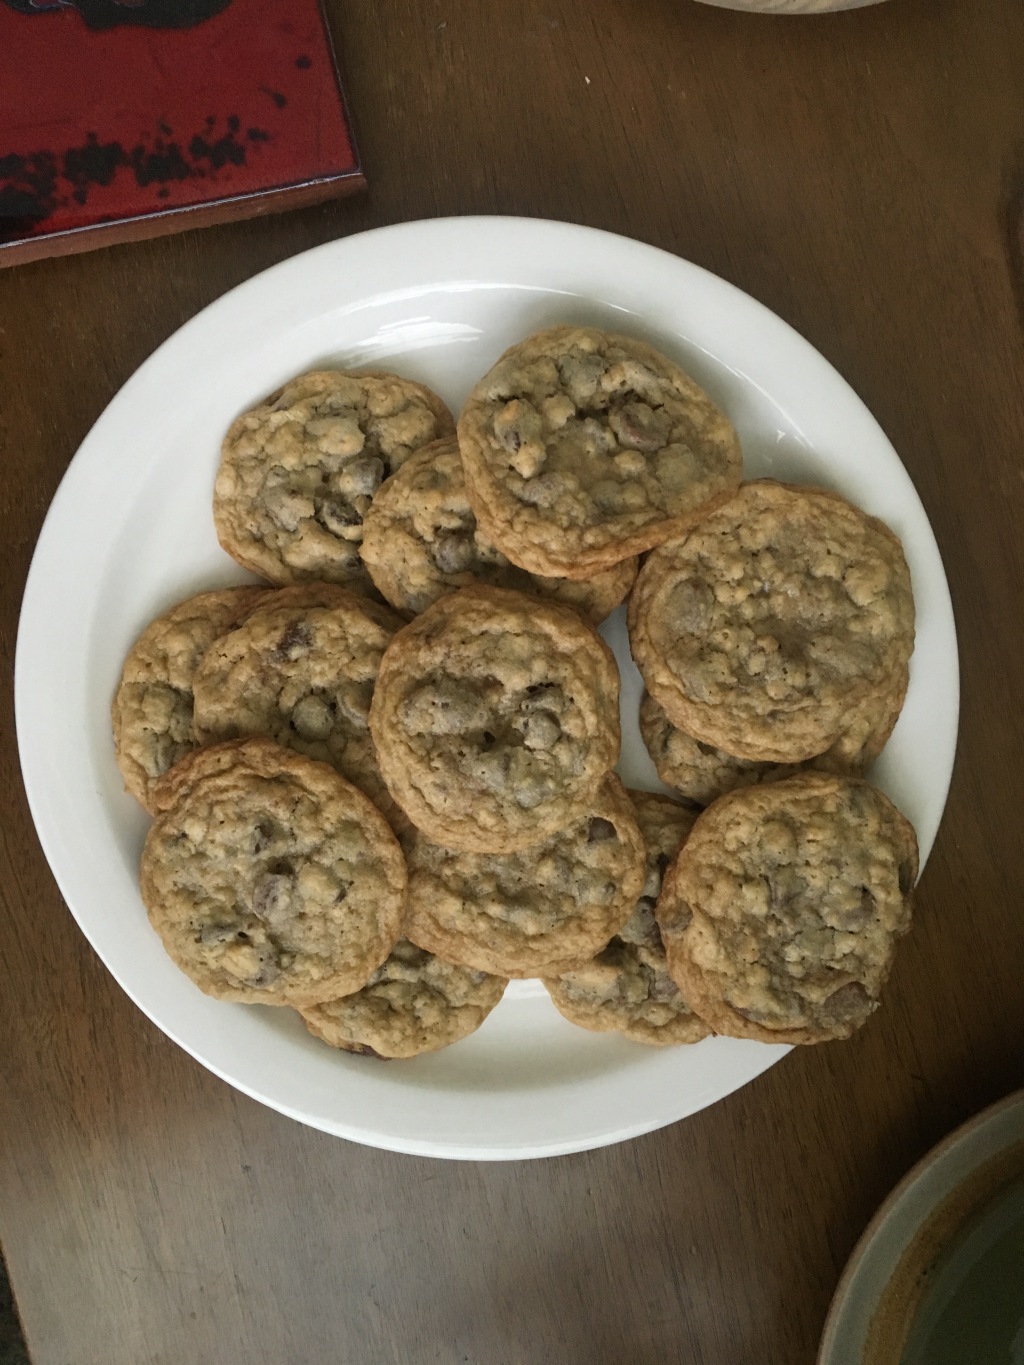
These cookies have a very unassuming name, but they are anything but ordinary.  The texture is always perfect, they rise up beautifully, stay soft and chewy and there’s a little salt that sets off the chocolate perfectly.  I like to make a smaller batch and even then I end up freezing what we don’t eat the first day because if I don’t what’s left finds it’s way to my mouth with a quickness.  Feel free to double if you’re baking for a crowd. The recipe was King Arthur Flour’s recipe of the year for 2015, and they have so many good ones, so starting this year with last years best seems only appropriate.

1/2 cup butter at room temperature

1/2 cup light brown sugar

1/4 cup granulated sugar

1 large egg (room temp preferred)

2 teaspoons vanilla extract

1 cup all purpose flour

1/2 cup oats (quick or old fashioned)

1/2 teaspoon baking powder

1/2 teaspoon baking soda

1/2 teaspoon (coarse) kosher salt (or 1/4 teaspoon table salt)

1 1/2 cups semi-sweet chocolate chips


  1. Preheat oven to 325 and spray or line your pan with parchment or silpat
  2. Beat together butter, and sugars until smooth
  3. Add egg and vanilla beating well after each
  4. Whisk together flour, oats, baking powder, baking soda and salt, and add to the butter mixture.
  5. Mix until everything is thoroughly incorporated.  Scrape bottom and sides of bowl, and mix briefly.
  6. Scoop dough onto prepared baking sheet leaving about 2 inches between cookies.
  7. Bake for 10-13 minutes or until they are light golden brown at the bottom and edges but still look shiny in the middle.
  8. Remove from oven and once they are set enough to handle transfer to racks to cool.

Recipe adapted from King Arthur Flour Chocolate Chip Oatmeal Cookies 2015


Betsy’s 1, 2, 3 English Toffee

TwoCarolines_BetsysToffee_1.jpg

You can’t tell me that the holidays are done! It’s not truly over until you are passed out in a sugar induced coma on New Year’s Day. (I know we were healthy yesterday, but that earns us the right to be gluttons for another few days, right?) Well, we here at Two Carolines have got your back. This toffee recipe is super easy and ever since my rad friend Betsy taught my roommates and I this recipe years ago in San Francisco, it’s been my go-to! She was kind enough to offer to share it with all of you, as well! Lucky us, right? So, without further ado, here is Rad Betsy with her perfect 1, 2, 3 Toffee recipe…

I’m so happy to share my family’s homemade english toffee recipe!  For as long as I can remember, this toffee has been a staple of the holiday season in my house.  My grandmother use to make it during the holidays, my mom still makes it during the holidays to gift to friends and neighbors and now I do the same.  It’s always a hit, has a big wow factor and couldn’t be easier to make.

The method we use is the “1, 2, 3 recipe.”
1 cup granulated sugar
2 sticks salted butter
3 tablespoons water
Put all ingredients in your biggest, heavy-dutiest frying pan on HIGH.  Before you do this make sure you have an 8 or 9 inch metal cake pan right next to you.
Cook on high stirring CONSTANTLY with a wooden spoon.  You’ll watch it change from a melted butter looking mixture to a more creamy looking mixture and before you know it, it’ll start turning light brown.  Literally stir, stir, stir, stir until it’s basically the color of a brown paper bag (that’s how my mom and grandma always described it…no candy thermometers involved!).  While still stirring the boiling hot mixture, pour it into your cake pan and you’re done!  It will literally be just starting to smoke when you quickly dump it carefully into your cake pan.
I usually take my frying pan directly to the sink and turn hot water on it right away and I use my spoon to scrape out any remaining toffee.
Let the toffee cool in the pan for apx. 10-15 minutes or until you can sprinkle chocolate chips on it without them sinking right in (about 10 minutes).  The remaining heat from the toffee will melt them within a couple of minutes.  Once melted, smooth them over the top with the back of a spoon.  Traditionally, I top them with finely chopped walnuts but you can experiment with whatever you like (fleur de sel for your non-nut friends is delicious)!
Once completely cooled and chocolate is set, turn it out on a big sheet of foil.  I then gently bang/tap it into pieces with a mallet or my knife sharpening tool from my knife block…whatever works.
TwoCarolines_BetsysToffee_11.jpg
Added bonus is the nuts that remain on the foil make the BEST ice cream topping.  Nuts with little shards of toffee and chocolate = heaven.
So that’s the official Taylor/Heywood/Santos family recipe!  It can take a tiny bit of practice.  If you cook it too long, you’ll know it b/c it’ll have a slightly bitter taste.  If you cook it too little, it may be a bit chewy.  You’ll get it though!  It’s really quite an easy process.  I have two cake pans and I’ll usually do two batches late in the evening…get them all ready and then in the morning they are perfectly ready to prep and package up for friends and neighbors.
Happy holidays!

Creamy Salty Browned Butter Rice Krispie Treats


TwoCarolines_CreamySaltyBrownedButterRiceKrispieTreats.JPG

I’ve had more than a little insight on myself while living abroad this past year and a half. One of these “ah-ha” moments was realizing that if I don’t have access to something I could have back home, I get an insatiable desire to possess and/or consume it. Even if it’s something that I never really cared about that much before in the homeland. Before we get all Freudian on what that could mean about my psyche, let’s just get into how obsessed I became with Rice Krispie treats. There is no Rice Krispie cereal here in Berlin and therefore, I got a major itch to make Rice Krispie Treats. Thankfully, I had a friend get a box for me in Italy, and another sweet friend sent me a care package with supplies to make the elusive treats. Included in the package was white chocolate chips—her secret ingredient. Around this time, I had a few people tell me about Smitten Kitchen‘s recipe with browned butter and sea salt. I figured that this concoction, plus the addition of white chocolate chips would put this unassuming dessert insanely over the top—and I was extremely correct. So in conclusion, if you want some bourgeois Rice Krispie treats that will blow everyone’s mind, get on it and exercise your right to buy up all the Rice Krispies you can get your hands on and make these.

4 ounces (1/4 pound or 1 stick) unsalted butter, plus extra for the pan
1 10-ounce bag marshmallows
1 cup white chocolate chips
Heaping 1/4 teaspoon coarse sea salt
6 cups Rice Krispies cereal (about half a 12-ounce box)

Butter an 8-inch square pan.

In a large pot, melt butter over medium-low heat. Stirring constantly until browned and smelling nutty. Watch carefully, so as not to burn.

As soon as the butter turns golden brown, turn heat to low and stir in the white chocolate until melted. Turn off the heat, add the marshmallows and stir until melted and smooth—return to low heat if necessary.

Remove the pot from the stove and stir in the salt and cereal together. Once halfway mixed, I butter my hands and get in there to make sure everything is evenly distributed. Immediately spread into prepared pan and press down until even. Let cool completely (ha—yeah right!) before eating. Wait for copious amounts of compliments and proposals of marriage and co-habitation.

Recipe adapted from Smitten Kitchen

Apricot Bars

TwoCarolines_ApricotBars.jpg

Recently, one of my favorite humans came to visit me—my cousin Bret and I have had a special bond, since I was a wee little one, so it was a delight to have him visit. We walked all over Berlin, going to Christmas markets and eating our way through the city. Dreamy, right? He was jonesing for our Grandma King’s Apricot Bars, so I asked my mom for the recipe and whipped them up really quick. Now, there is some doubt cast on whether this is the right recipe or not, but regardless I’m sticking with this one, because it’s on point! This recipe is super easy and cinchy to alter since it’s so basic. I changed out 2 oz. of the apricots and used candied ginger for a holiday twist, and a drizzle of glaze for an added touch.

Ingredients

Apricot Filling
8 ounces dried apricots (I did 6oz. apricots, and 2oz. candied ginger)
1/2 cup white sugar
2 tablespoons lemon juice
water to cover

Base Ingredients
1 cup all-purpose flour
1 cup old fashioned rolled oats
1 cup packed brown sugar
pinch of salt
1/2 cup butter, browned

Directions

Preheat oven to 350 degrees F (180 degrees C).

Coarsely chop apricots (and ginger pieces, if using) and place in small saucepan. Add lemon juice, and white sugar. Add enough water to just cover the apricots. Bring to a boil, and cook until fruit is soft and the liquid cooks down and is glossy.

Mix flour, oatmeal, pinch of salt, and brown sugar together. Melt butter until browned and stir into flour mixture. Put 3/4 of this mixture into 8 x 8 inch greased pan. Spread apricot mixture over crust. Sprinkle remaining oatmeal mixture over apricots.

Bake for about 35 minutes.

Note: You could easily switch the fruit to anything your little heart desires—Or top with a glaze and add slivered almonds or pecans. This is a really versatile, easy recipe!

Brown Sugar Apple Cake

IMG_0331
brown sugar apple cake

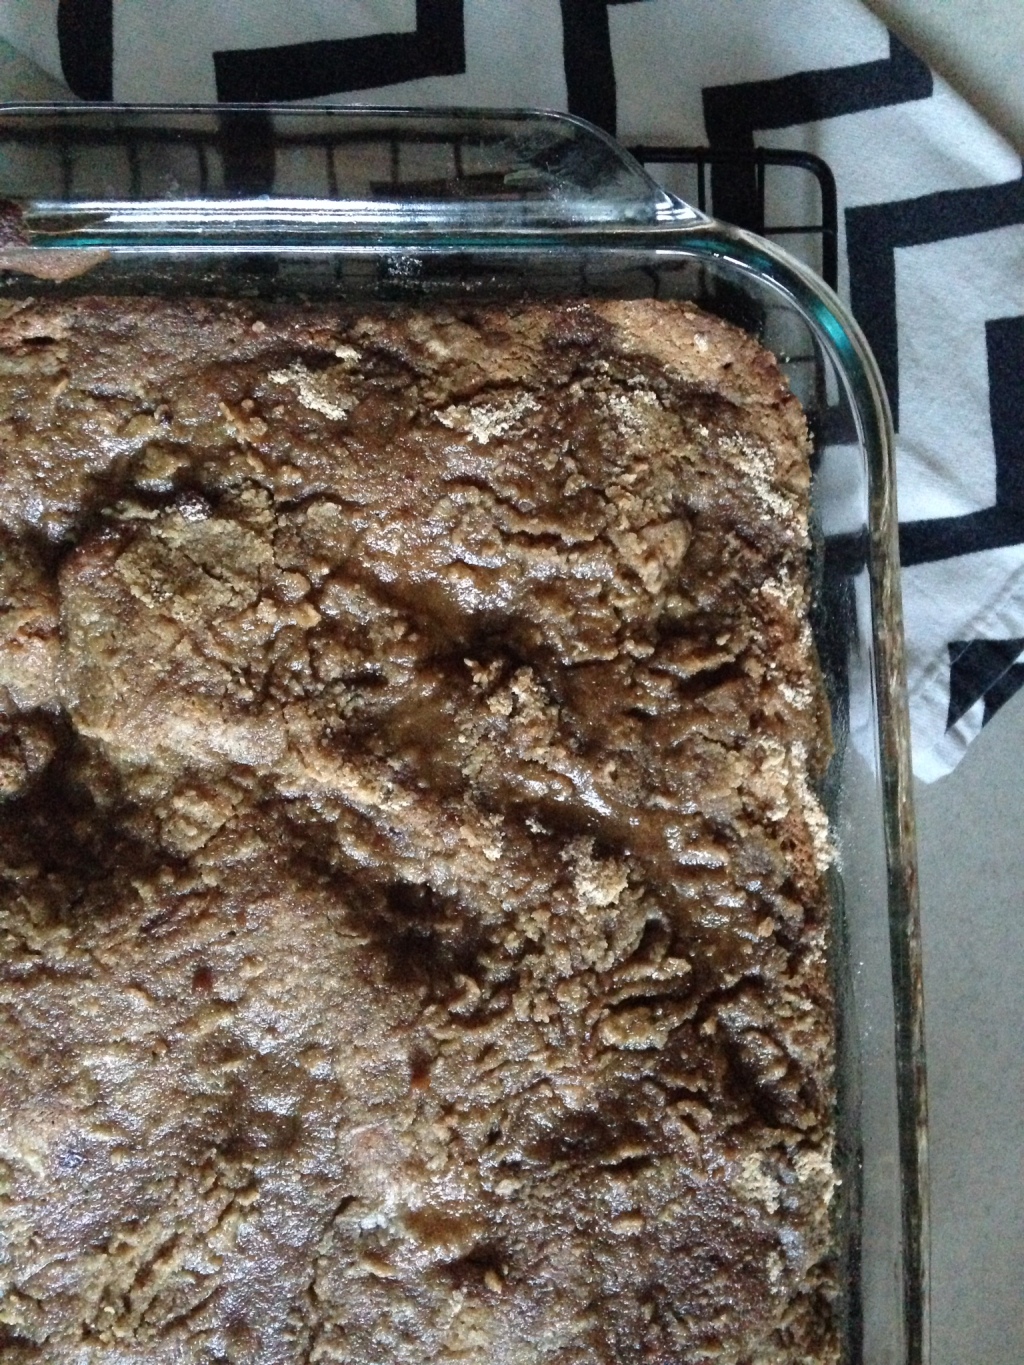
There are so many apple cakes out and about these days, and at least as many coffee cakes, and probably hundreds of cinnamon crumb type of cake situations, but I swear, this one wins on all counts.  I call it Brown Sugar Apple Cake because it has 2.5 cups of that sweet brown goodness.  So I might be failing a little when it comes to the expressed goals at our last twocarolines meeting to include more simple (hello- babka!) and healthy (um….nope) recipes.  I will keep those goals in mind in future postings, but for now, I will show you how to make what is truly one of the most delicious cakes in my repertoire. We usually eat it as a breakfast cake but it certainly has what it takes to star in a dessert cake show as well.  And you’re welcome to omit the apples, if you’re CRAZY! This cake won’t judge, it bakes up perfect either way.

For the cake:

1 stick butter

1 1/2 cups packed light brown sugar

2 large eggs

2 cups all purpose flour

1 teaspoon baking soda

1 teaspoon cinnamon

1/2 teaspoon salt

1 cup sour cream

1 teaspoon vanilla extract

2 cups peeled, cored and chopped apples (usually 2 large-medium apples)

Crumble Topping:

1/2 cup packed light brown sugar

1/2 cup all purpose flour

1/2 teaspoon cinnamon

4 tablespoons unsalted butter softened

Brown Sugar Glaze:

1/2 cup packed light brown sugar

1/2 teaspoon vanilla extract

2 tablespoons water


Make the Cake:

  1. Preheat oven to 350.  Lightly grease a 9×13 glass baking dish with either butter or cooking spray.
  2. In a large bowl, cream together the butter and sugar until light and fluffy.  Add the eggs 1 at a time, beating after the addition of each.
  3. In a seperate bowl mix flour, baking soda, cinnamon and salt.
  4. Add to the wet ingredients, alternating with the sour cream and vanilla.
  5. Fold in the apples. Pour into prepared baking dish spreading out to the edges

Make the Topping:

  1. In a bowl combine the sugar, flour, cinnamon, and butter, and mix until it resembles course crumbs.  Sprinkle topping over cake.
  2. Bake until golden brown and set, 35-40 minutes.  Remove from the oven and let cool 5 minutes or so.

Make the Glaze:

  1. Combine the sugar, vanilla, and water and mix until smooth.  Drizzle the cake with the glaze and let harden slightly.

I think this cake is best after it’s cooled down completely, but if you can’t help yourself go ahead and serve warm.  It keeps as long as it’s sealed for a good 3-4 days.

Recipe adapted from Emeril Lagasse Apple Coffee Cake with Crumble Topping and Brown Sugar Glaze 


image

Chocolate Babka


IMG_9878
chocolate babka

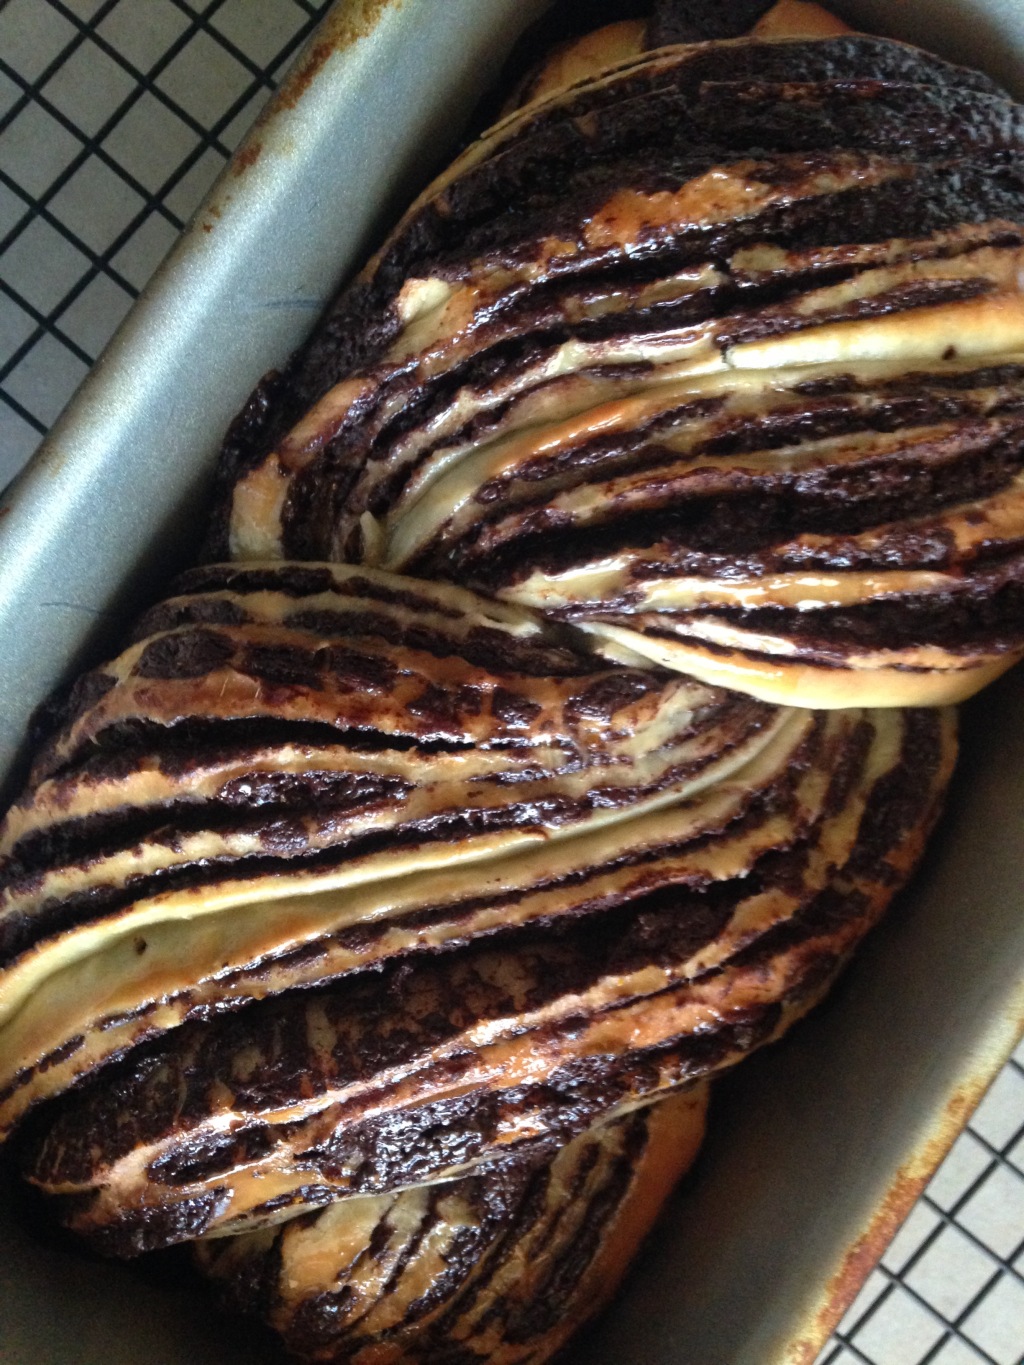
I have been intrigued and intimidated by the twisty beautiful sweet bread known as the “Babka” for some time now.  I talked myself out of attempts to make it assuming it would we way too hard and should probably be left to the professionals, but you guys, I did it, and IT WAS AWESOME!  I’m certain that if I can pull this off, you can too, so don’t wait as long as I did and seriously just make this, you’ll be so glad you did!  I did enlist the help of my favorite food blogger @smittenkitchen Deb Perelman who gave super helpful step by step instructions and tips.  I can’t say I strayed to far from her recipe, but I’m excited to mix it up in future batches.  I’m sure you could make this with a cinnamon spice filling that would be epic or even something fruit-ish like with raspberry jam and cream cheese.  Listen to me getting all excited about the babka possibilities of my future.  Please enjoy!

Dough –

4 1/4 cups all purpose flour

1/2 cup sugar

2 teaspoons instant (rapid rise) yeast

grated zest of half an orange (you could also do a lemon, but orange was sublime)

3 large eggs

1/2 cup water (cold is fine) and up to 1-2 tablespoons extra if needed

3/4 teaspoon salt

2/3 cup butter at room temperature


Filling –

4 1/2 ounces (130 grams) dark chocolate (or 3/4 cup chocolate chips)

1/2 cup butter (cold is fine)

scant (means, not all the way full) 1/2 cup powdered sugar

1/3 cup cocoa powder

1/4 teaspoon cinnamon (optional, but awesome)


Syrup –

1/3 cup water

6 tablespoons sugar


Make the Dough

  1. Combine the flour, sugar yeast and zest in the bottom of the bowl of a stand mixer.  Add eggs and 1/2 cup water, mixing with the dough hook until it comes together; this may take a couple of minutes.  It’s okay if it’s on the dry side, but if it doesn’t come together at all add some extra water a tablespoon at a time.
  2. With the mixer on low add the salt and the butter, a spoonful at a time, mixing until it’s incorporated into the dough.
  3. Mix on medium speed for 10 minutes until dough is completely smooth; you’ll need to scrape the bowl down a few times.  After about 10 minutes, the dough should began to pull away from the sides of the bowl.   I needed to add a few extra tablespoons of flour to help this process along.
  4. Coat a large bowl with oil – I used the mixer bowl by taking my dough out for a minute and greasing it down then plopping the dough back in.  Cover with plastic wrap and let it refrigerate at least 6 hours or overnight.  (don’t worry if it doesn’t look like it doubled, it won’t rise as much as you think – but it will still work!)

Make Filling IMG_9871

  1. Melt butter and chocolate together until smooth.  Stir in powdered sugar and cocoa; mixture should form a spreadable paste – but it’s not super thick – it thickens up as it cools.  Add cinnamon if desired.

Assemble Loaves

  1. Coat two 9-by-4 inch loaf pans with oil or butter and line the bottom of each with a rectangle of parchment paper.  Take half the dough from the fridge (leave other half chilled).  Roll out on a well-floured counter to about a 10 inch width (side closest to you) and as long in length.  So about a 10×12 inch square or thereabouts.
  2. Spread half of the chocolate mixture evenly over the dough, leaving a 1/2 inch border all around.  Brush the end farthest away from you with water.  Roll the dough into a long tight cigar and seal dampened end.  Keep as cold as possible – I put my cigar in the freezer while I rolled out the other half.  IMG_9876
  3. Repeat these steps with the other half of the dough
  4. Gently cut log in half right in the middle, then cut your now two logs length-wise right down the middle opening them up and lay them next to each other cut sides up.  Do the same with your other cigar/log of dough.
  5. Pinch the top ends together and gently lift one side over the next, forming a twist, keeping the cut sides up because they are so pretty.  Pinch at the other end once you’ve made your twist.  Don’t stress out if it isn’t perfect – it will all look great and taste amazing and the next rise will hide mistakes for you.
  6. Put your twisted dough into the prepared loaf pan and repeat with other dough.
  7. Cover with damp tea towel and let rise a good 1 1/2 -2 hours at room temperature.  Pre-heating oven to 375 towards the end of your rise.

Bake and Finish Cakes

  1. With oven at 375 – Remove towels, place each loaf on the middle rack of your oven.  Bake for 30 minutes, but you can check doneness at 25.  Mine needed the full 30.  My first I took out too early and it was a bit undercooked in the middle.  If your babka is done you will feel almost no resistance when you push in a toothpick or cake tester.
  2. Make syrup while babka’s are baking.  Bring sugar and water to simmer until sugar dissolves.  Remove from heat and set aside to cool a little.  As soon as your babka’s leave the oven, brush the syrup all over each.  It will seem like too much, but will taste perfect.
  3. Let cool about halfway in the pan, then transfer to a cooling rack to cool the rest of the way (not something we had the patience for but suit yourself).

Recipe from Smitten Kitchen 2016


St. Lucia Saffron Buns (Lussebullar)

TwoCarolines_StLuciaSaffronBuns.jpg

One of the benefits of living in Berlin is being so close to other cultures that I haven’t been exposed to previously. In my time here, I’ve made good friends with a wonderful (and of course very attractive, as northern europeans tend to be) Swedish couple. Girl Swede and I like to get together and bake during the week and she is always introducing me to her amazing traditional Swedish recipes. On December 13th, the Swedes celebrate St. Lucia Day and these buns are a traditional confection that accompanies the holiday. You know I’m down for any holiday that comes with it’s own special food! Bring on the light crowns and long live the Swedes!

TwoCarolines_Saffron.JPG

6 ounces butter, melted
2 1/2 cups lukewarm milk
3/4 teaspoon saffron threads (or 1 gram of saffron powder)
1 cup sugar
1.7 ounces fresh yeast
1/2 teaspoon salt
1/2 cup quark or full-fat greek yogurt
2 pounds wheat flour, or as needed
Raisins, for garnish (Girl Swede and I like more raisins throughout the roll, so we added a handful or two to the dough)
Beaten egg, for brushing


Place the butter and milk in a medium bowl. Using a mortar and pestle (or a teaspoon and small bowl, since that’s all we had), grind the saffron with a pinch of the sugar, and stir into the mixture. In a large bowl, dissolve the yeast in a little of the lukewarm butter mixture, then add the remaining butter mixture, the remaining sugar, quark or greek yogurt, the salt and raisins as desired.

Gradually add enough of the flour (almost all of it) to make a workable dough, kneading for 10 minutes by hand or 5 minutes in a mixer with a dough hook. Shape into a ball, sprinkle with a little flour and cover with a cloth. Allow to rise in a warm spot for 30 to 45 minutes.

Transfer the dough to a floured work surface, and knead in additional flour if the dough is sticky. Break off a piece and form it into a ball about 2 inches wide (60 to 70 grams if you are weighing). Roll the ball out into a snake, about 14 inches long. Then curl the ends in opposite directions, forming an “S” with spirals at each end. Place on a lined baking sheet and repeat with the rest of the dough. Cover with plastic wrap and place in a warm spot until the dough shapes double in size, 30-45 minutes. Preheat the oven to 400.

Brush the buns with beaten egg, and press raisins lightly into the dough. Bake until golden and risen, or until a toothpick inserted into the center of a bun comes out dry. Smaller buns may take 8 to 10 minutes; larger lengths and braids, 15 to 20 minutes. Cool the buns on a rack under a cloth.

Recipe adapted from The New York Times

Double Dark Chocolate Muffins

IMG_0302Chocolate for breakfast is kind of a thing for us here at the King casa – one of my children would go to school hungry if I didn’t give her something slathered in Nutella every morning.  The only time she’ll make an exception is when there’s a chocolate muffin involved.  This is only one of our favorite chocolate muffin recipes the other I will share with you soon – but let’s be honest and admit that sometimes, we eat an unfrosted cupcake for breakfast and call it a muffin so we can pull it off.  These are so decadent that a swirl of frosting on top would make for an epic cupcake, but because some nights (particularly the ones with newborn babies) require sweet chocolately mornings, I’m going to call these muffins and feel really good about it.


Ingredients –

2/3 cup dutch process cocoa (you can totally use normal cocoa, but the dark and decadent factor goes through the roof when you use the good stuff)

2 cups all purpose flour

1 1/2 cups light brown sugar

1 teaspoon baking powder

3/4 teaspoon espresso powder (I don’t have any so I don’t use this)

1 teaspoon baking soda

3/4 teaspoon salt

1 cup chocolate chips

2 large eggs

3/4 cup milk

2 teaspoons vanilla

2 teaspoons vinegar

1/2 cup butter melted (or you can use 1/3 cup vegetable oil – I like to use coconut oil but those pictured have butter)

course sugar or pearl sugar for topping


  1. Pre-heat oven to 350.  Line standard muffin pan with cups and grease the bottoms of your cups.
  2. In a large mixing bowl, whisk together the cocoa, flour, sugar, baking powder, espresso (if using) baking soda, salt and chocolate chips.  Set aside.
  3. In a medium bowl , whisk together the eggs, milk, vanilla, and vinegar.  Add the wet ingredients, along with the melted butter, to the dry ingredients, stirring to blend; there’s no need to beat these muffins, just mix until combined.
  4. Scoop the batter into the prepared muffin tin.  Sprinkle with raw sugar or pearl sugar.  Note that the cups will be heaped with batter and the muffin will bake into a mushroom shape.
  5. Bake the muffins for 20-25 minutes – mine are usually done closer to 20, or until a cake tester comes out clean.  Remove from the oven and after 5 minutes take muffins out of the pan and allow them to cool on a rack for about 15 minutes before eating.  I individually wrap what we don’t eat the first day or two and put them in the freezer so we can defrost in the morning and eat them for weeks.

IMG_0301

Recipe from King Arthur Flour Chocolate Breakfast Muffins – side note, their website is so awesome and their Instagram feed is beautiful so check it if you’re into food!

Double Chocolate Chili Cookies

Last year, at around this time, my parents came to visit me in Berlin. We went to as many Christmas markets as we could and took a road trip through other parts of Europe. It was so wonderful! One of our trip highlights was here in Berlin. We went to get this amazing rich and sehr lecker (very delicious as they say in Deutsch) hot chocolate at Fassbender and Rausch. And sorry but, there is no Michael Fassbender to greet you, unfortunately. However, you can get a lot of cakes and other treats, but most importantly their hot chocolate—which is basically just melted chocolate bars—a great break from the super cold weather! I ordered the chocolate with chili and became obsessed with the flavor combo. Cut to my birthday this year and my friends here gave me about 10 bars of Lindt Chili Dark Chocolate—such good friends, right? Since that time, I’ve had the idea that I want to make those into cookies and now here we are. If you like spice at all, you will love these! Chewy, a little crispy, extremely chocolatey and obviously, spicy.

TwoCarolines_DoubleChocolateChiliCookies

1 cup all-purpose flour
1/2 cup unsweetened Dutch-process cocoa powder
1/2 teaspoon baking soda
1/2 teaspoon salt
1 bar of dark chocolate (ideally 70% cacao), coarsely chopped
1 bar of  Lindt Chili Dark Chocolate, chopped into small chunks
1 stick (8 tablespoons) butter
1 1/2 cups sugar
2 large eggs
1 teaspoon pure vanilla extract
chili powder for topping

Preheat oven to 325 degrees. Whisk together flour, cocoa powder, baking soda, and salt in a medium bowl; set aside. Melt 1 bar of coarsely chopped dark chocolate with the butter in a small heatproof bowl set over a pan of simmering water.

Transfer chocolate mixture to the bowl of an electric mixer fitted with the paddle attachment. Add sugar, eggs, and vanilla; mix on medium speed until combined. Reduce speed to low; gradually mix in flour mixture. Fold in the chili chocolate chunks.

Scoop batter using a 1 1/2-inch ice cream scoop; place 2 inches apart on parchment-lined baking sheets. Bake until cookies are flat and surfaces begin to crack, about 15 minutes. Transfer on parchment to wire racks. Let cool 5 minutes. Once cool, take small teaspoon and carefully sprinkle with chili powder until desired spicyness. (You can even wipe some off after and it still will look nice)

Recipe adapted from Martha Stewart